Studio
1. Work Stations
1.1 Full-Audio Support
Some work stations in the Bates Sound Studio, located in room 302 of the Olin Arts Center., are equipped with full audio support and are available in 3 spaces:
- the “mainspace” iMac at the front of the studio (under the projection screen)
- Studio A
- Studio B
They look like this:
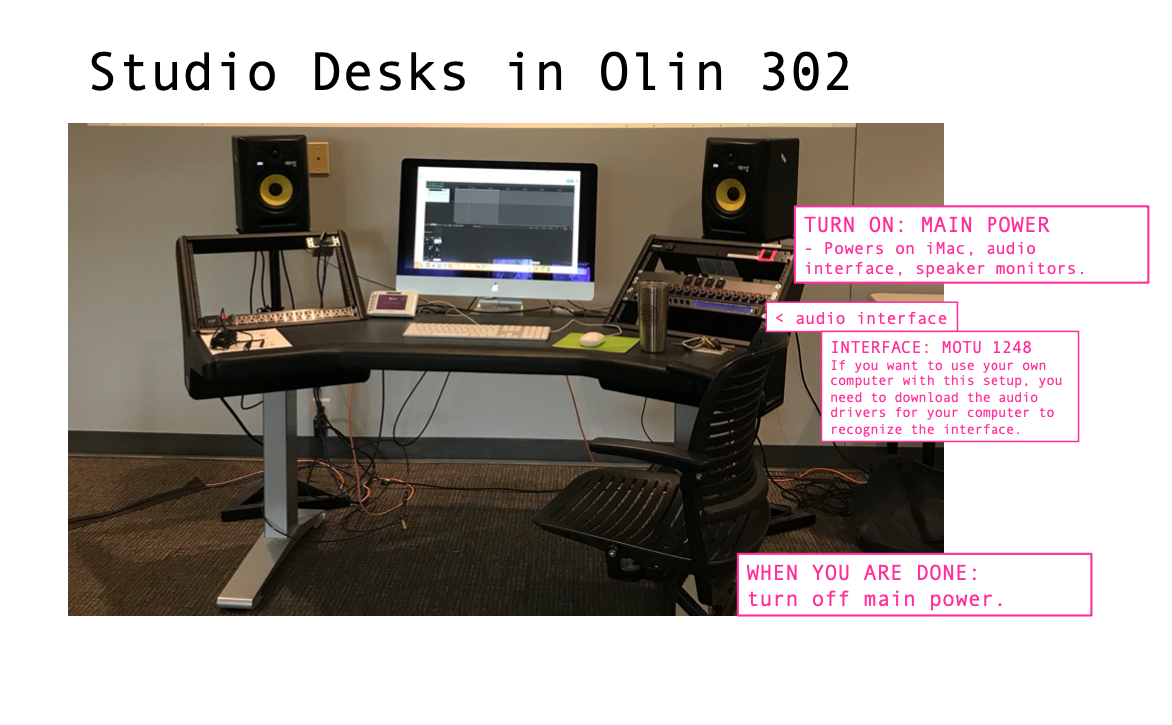
These stations with full audio support are best used for recording and mixing. If you do not need full support or can work on headphones, please leave these stations open to those who may need them. You may be asked to move to another computer but only if necessary. Of course, if no one else is using these stations, reserve time here and make ample use of access to a high quality audio system!
1.1.1 Using Your Own Computer
As the photo shows, download MOTU Audio Drivers to your own laptop if you’d like to connect your device to the speaker system. Ensure you’ve downloaded and installed the driver that corresponds with your computer’s operating system.
1.1.2 Help Documents
If you’re unsure how to use these work stations, consult the following resources:
If you’re unable to resolve a problem that comes up during your reserved session, contact the instructor and studio assistant for additional troubleshooting steps. Note: We may likely not be reachable immediately or “on the fly.”
If you run into trouble, document the steps you’ve taken and send us an email to report any unresolved issues before you leave the studio.
1.1.3 Reaper Export Format
Whether you’re working on your own laptop or one of our studio iMacs, to get the desired sample rate and bit depth, follow these guidelines. In Reaper, when you’re ready to export your project and make a sound file, Go to File > Render… and make the following change to the values in the Render to File options window that pops up next:
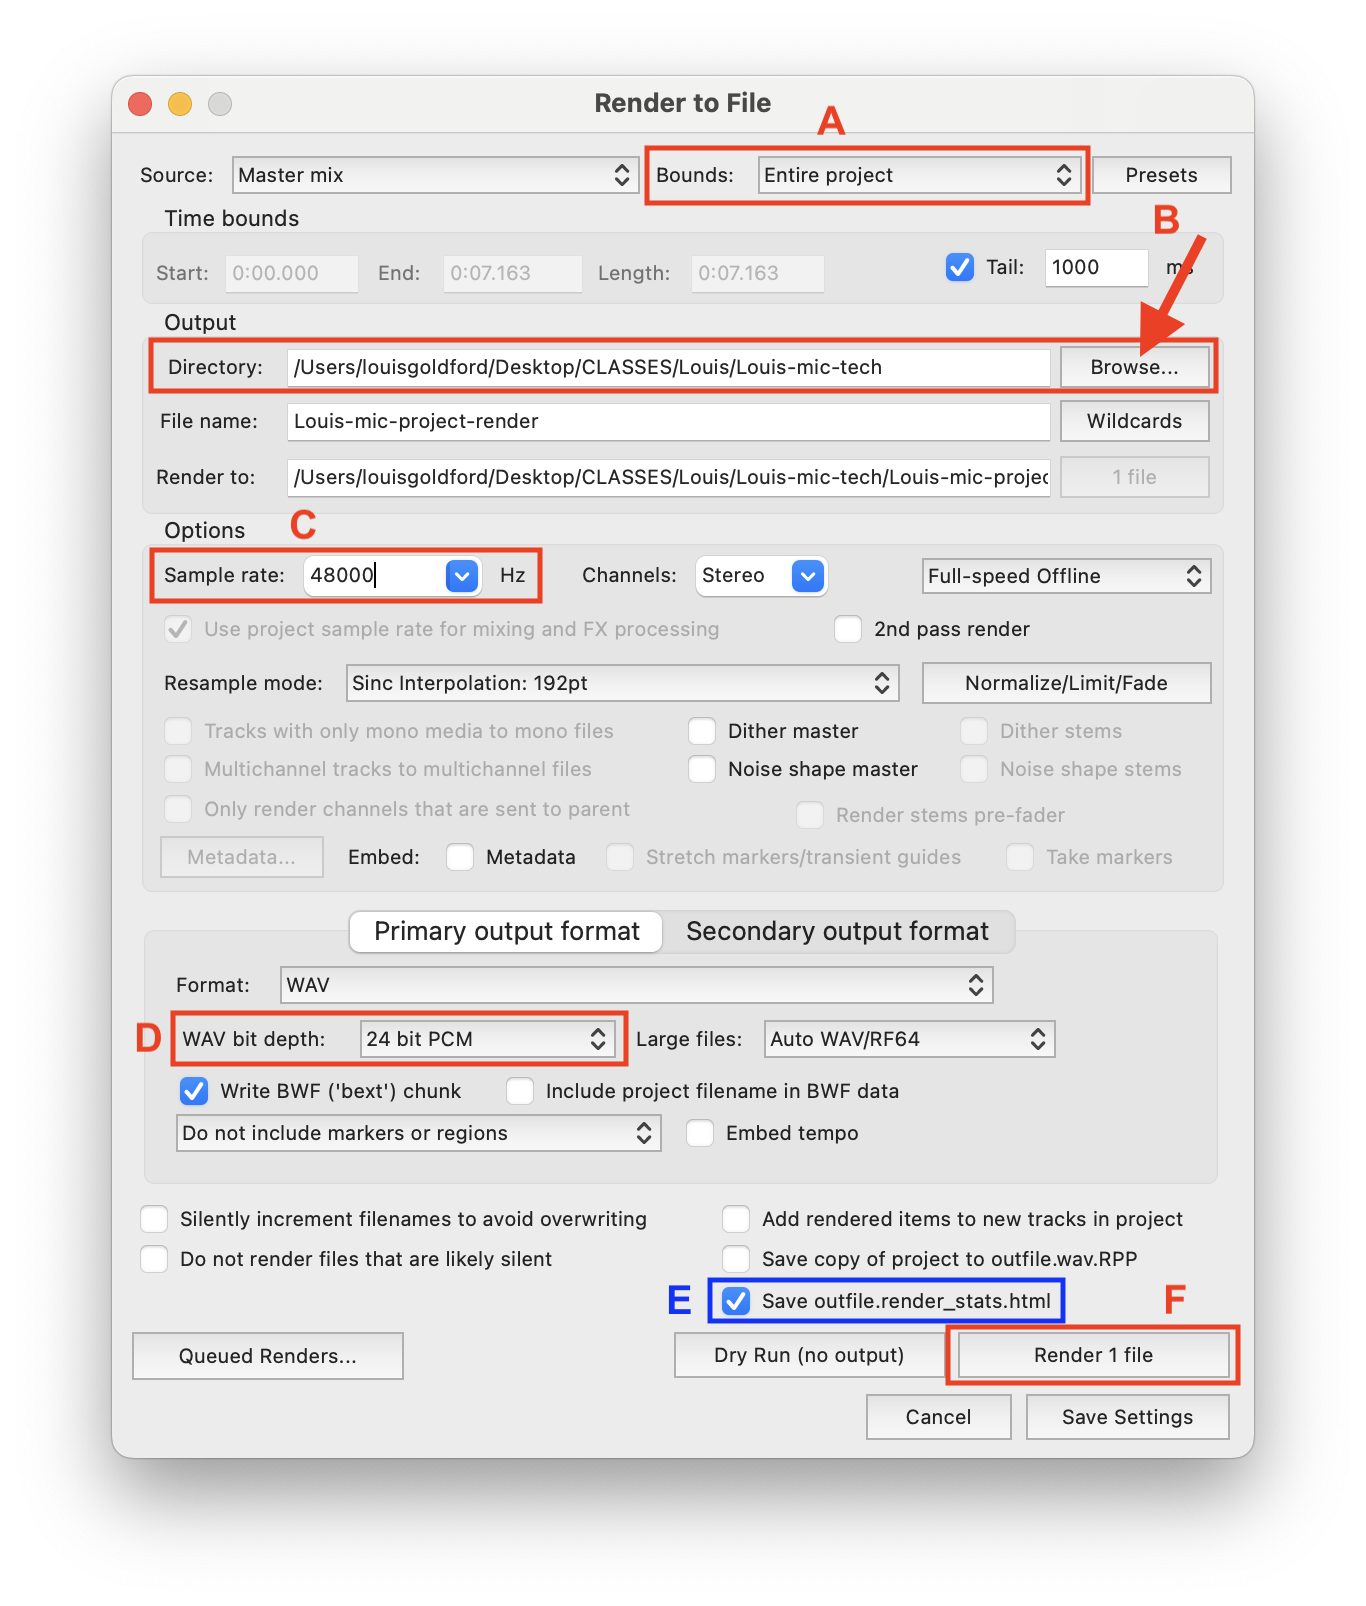
A: By default this should say “Entire project,” so you shouldn’t have to change it.
B: Your output sound file should be written to a dedicated folder that contains all files included in your project. The file path in this example is what it should look like if you’re working on one of our studio iMacs (find the /CLASSES folder on the Desktop). But if you write to another location, not to worry: simply drag-and-drop your output file, wherever it is, into your project folder, after you “render” (i.e., write the file). Click on the “Browse” button (see red arrow) to navigate to a folder of your choosing.
C: Change the sample rate to 48,000. By default, this might show 44,100 or something else.
D: Change the bit depth to 24. By default, this might show 16 or something else.
E (optional): If you check this box, Reaper outputs a handy dandy webpage (.html file) that includes output statistics for how it writes your file.
F: Last but not least, click this “Render” button to begin the file output. You’ll see a kind of progress bar pop up that writes the waveform from left to write. This should only take a few seconds for a short file.
1.2 Other Work Stations
1.2.1 Sound Studio Macs
Additionally, we have 3 studio computers equipped with our studio software, located at the back of the room. 2 of them are iMacs, and the last one is a Mac Studio. You can work on these stations with headphones, but they do not have audio interfaces or monitor speakers.
These are great stations for synthesis, spectral editing, Max patching, video, or multimedia software.
1.2.2 DMS iMac Lab
If we are running short on space or if there are a lot of sign-outs at a time when you need a computer, you can also work on similar stations in the Digital Media Studio iMac lab.
2. Studio Calendars
If you are enrolled in MUS218A or other studio courses, you will receive access to the following calendars. Students use these calendars to reserve time in the Bates Sound Studio.
There are 3 possible spaces to work in: Studio A, Studio B, and the computers located in the mainspace (i.e., the open space where classes are taught). Students may use any of the 3 following calendars to access the Sound Studio for project work and to complete daily assignments.
Ensure that you are properly logged in to your Bates Google account. If you are viewing these calendars from a personal Google account, you’ll encounter an error when trying to reserve time or access the calendar. Permission to these calendars will not be extended to personal Google accounts.
2.1 Mainspace Calendar
2.2 Studio A Calendar
2.3 Studio B Calendar
3. Studio Protocol
In professional studio environments, a studio protocol is a set of community guidelines and policies respected by all members to ensure an equitable, safe, clean, productive, and efficient working space for all users. Our studio is a space that sees frequent use. This means: we all need to work together to get things done, generously sharing tasks where we can. The following guidelines apply to all members of our sudio commumity:
3.1 Use of Facilities
- Calendar reservations are required and are exclusive. To enter the studio unsupervised for project work, you must be a Bates student currently enrolled in one of our studio courses.
- Studio guests must only be musicians or sound makers whose performances are recorded by currently enrolled students. You are responsible for any guests you bring in to record. Unauhtorized use is strictly prohibited.
- Ensure the door to 302 is locked when you leave. Do not leave the door propped open at any time.
3.2 Food, Beverage, Cleanliness
- Only covered, sealed, and secure beverages are permitted in the studio — such as an insulated travel vacuum flask or a sports water bottle with a secure cap. Uncovered beverages (e.g., Bates coffee mugs) or containers with flimsy lids (e.g., paper coffee cups) are never allowed and must be left outside the studio during class.
- No food of any kind is allowed in the studio. If you foresee that you will be working long hours that overlap with a meal or snack, use the kitchenette and lounge just outside of the studio. Return to your work when you’re finished.
- Keep the studio as clean as you can. Wipe down all surfaces, including computer keyboards and MIDI controllers, using the provided disinfecting wipes.
3.3 Equipment Usage
- Power down the studio before you leave. Turn off lights if you’re the last person to leave. Put the computer you were using into sleep mode. Flip the main power switch at your station to OFF, ensuring the speakers, audio inteface, and MIDI controllers power down. If you have a minute, check the other stations.
- Do not remove any equipment from the studio unless it has been explicitly loaned to you (under your name). Equipment remains on the premises. Fines will be charged if equipment is removed, lost, or goes missing from the studios without prior approval.
- Return all equipment to its designated place in the studio. Whether it’s a wall pin holding a cable, a shelf holding a speaker or microphone, or a chair for a computer station, make sure the next person can find it where they’re expecting it.
- Wrap (i.e., coil) all XLR and TRS cables properly using over-under technique after a tracking session. If you need a refresher on cable wrapping, review this assignment.
- Avoid crossing power cables with audio cables — especially unbalanced cables.
- If you notice equipment that is non-functional, or if you notice food or drinks that have been left behind or unattended, report these immediately. It keeps our working environment up to spec for all users.
3.4 Production Standards
- Our sample rate for audio work is 48 kHz with a bit rate of 24.
- Import and export audio files in a lossless format such as
.WAVor.AIFF. Lossy formats, such as.mp3, will not be accepted for submission or production. Avoid using.mp3files in your mix; they will duplicate compressed and low-quality audio even if you export lossless later. In other words: Do not settle for bad audio quality! - Monitor your work on headphones and/or speakers at a moderate level. 70–75 dB SPL (C-weighted, slow) is a good target range for the type of listening affored by the Bates Sound Studio. Step up to 80-83 dB SPL for occasional impact checks, but avoid mixing for long sessions at this louder level. It could damage your hearing in an untreated space. We also need to stay mindful of our colleagues: If you’re mixing in Studio A while others are working quietly at their stations or on their computers, do not saturate the studio with your mix. It’s unnecessary and potentially harmful to collective listening health. You can check this eaasily using a general or calibrated sound level meter app on your phone.
- In general, monitor on loudspeakers whenever possible, ensuring that others get a chance to listen on speakers. If you mix on headphones, be sure to at least test your mix on loudspeakers in our studio before submit your work.
- When saving your work on any of the Bates Sound Studio computers, be sure to use the dedicated
/PROJECTSfolder located on the Desktop, and be sure to read theREADME.mdfile for specific instructions and reminders. Regularly back up your work from studio computers onto your own external hard drive or cloud storage space (e.g., the Etna cloud partition).