Cloning a Remote Repo Using Your GitHub API Access Token
This brief tutorial proposes a quick & easy way of setting up your weekly repositories. Use this tutorial beginning in Week 5. BOOKMARK this page to easily retrieve it in the future.
In this tutorial, we’ll be:
- Creating a remote repository on GitHub.
- Using your GitHub API access token, previously created in Week 3, to CLONE your remote repository onto your local computer
- Making changes to the contents of your local repository, then running the normal sequence of git commands to version your files and push them up to your remote repository on GitHub (Review).
1. Create Your REMOTE Repository on GitHub
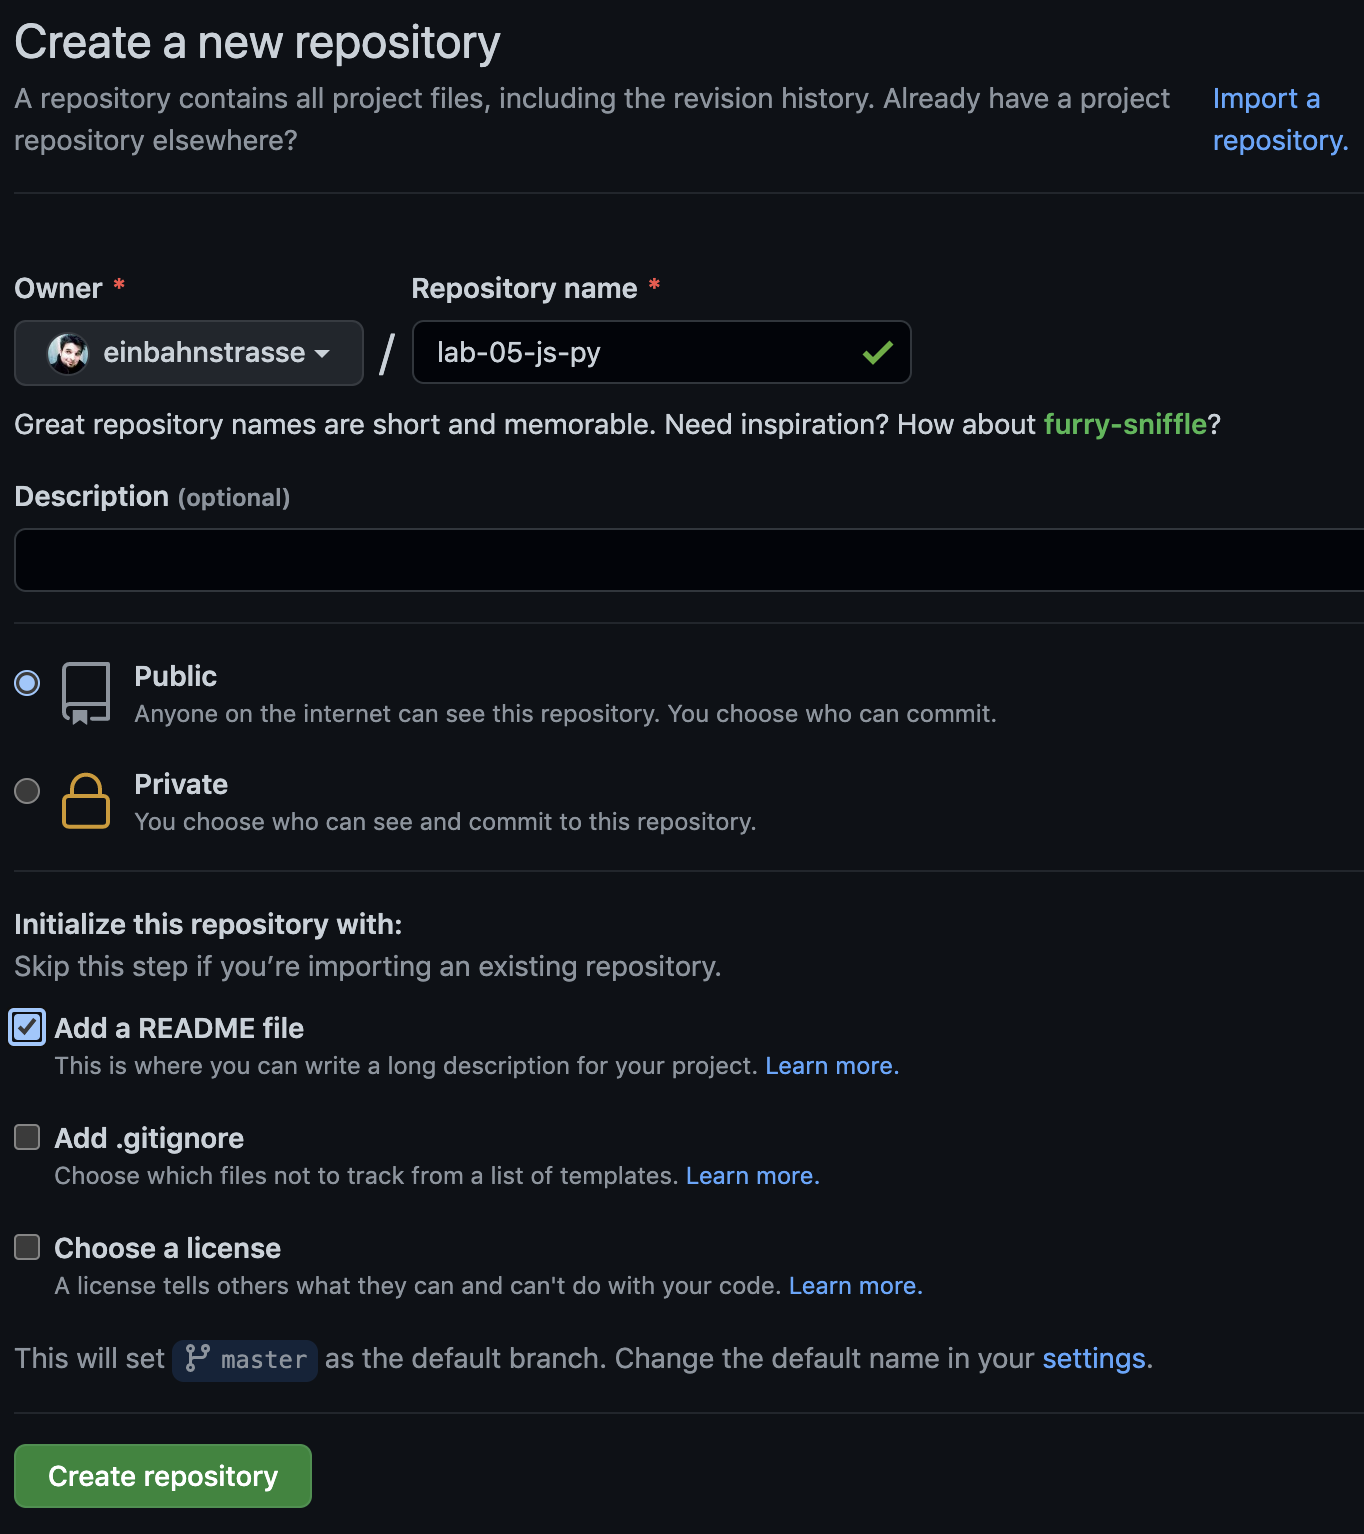
Set up a remote repository on GitHub as you normally would. From your home page on GitHub, click the green “New” button and on the next page, name your repository and be sure to select all of the correct options, just as we’ve done in previous weeks. For example, your repository for Week 5 should resemble this:

After you create your repository, you’re ready to CLONE it onto your local computer.
2. CLONE the Repo Using Your GitHub API Access Token
In git, making a clone is the process of copying of a remote repository onto a computer, thus creating a local repository. So, for lab 5 and all future labs, we’ll start by creating the remote repo first (as we have above in step 1), and then we’ll take the following steps to clone that remote onto our computer. When we do this, we can instantly start sending our commits to the remote. It’s a faster process than what we’ve done in Weeks 3 and 4.
Retrieve your GitHub API Access Token created in Week 3, and copy your token value to the clipboard.
In Terminal, navigate to your mtec1003 folder, where you keep repositories for this class. It should be something like:
$ cd Desktop/myClasses/mtec1003/ Now, copy the following command (careful, it’s long!) and paste it into your text editor (Atom, SublimeText, etc.):
$ git clone https://38597e1f2g1az2h5870fs6i465rty5w234c97qqq@github.com/yourGitHubUserName/lab-05-js-py.git Before running this in Terminal, in your text editor replace the fake API token (38597e1f2g1az2h5870fs6i465rty5w234c97qqq) with the token you created, and replace yourGitHubUserName with your actual GitHub username. This is the equivalent of using your GitHub password to “log in” to the GitHub API from the command line.
Also, be sure to change the name of the repository in this command (beyond week 5) to connect it to the remote repository you created for the current week. So, instead of lab-05-js-py.git you will need to be sure this name accurately matches the name you gave your repo on GitHub.
Does everything look good? Any errors? Check your spelling!
When you’re ready, copy your revised command, paste it on the command line, and press <ENTER> to run the command.
In your Terminal, the command and its output should resemble this:

Congratulations! You’ve successfully CLONED your remote repository onto your local computer and you’re now ready to run the normal sequence of git commands, such as git status, git commit, and git push, from your command line.
At this point, if you’re feeling confident about your git command skills, return to your lab to continue working. Or, read the last section for a quick review of the sequence of git commands necessary to version your work.
3. Make Changes to your File(s) and Version Them (Review)
From here on, you can add new files and revise old ones, then track their changes under git. As a quick example, make a change to the README.markdown file you created on GitHub, which has now been cloned onto your computer. open this file in your text editor and type something new, for example on line 3, and be sure to save your changes (locally):

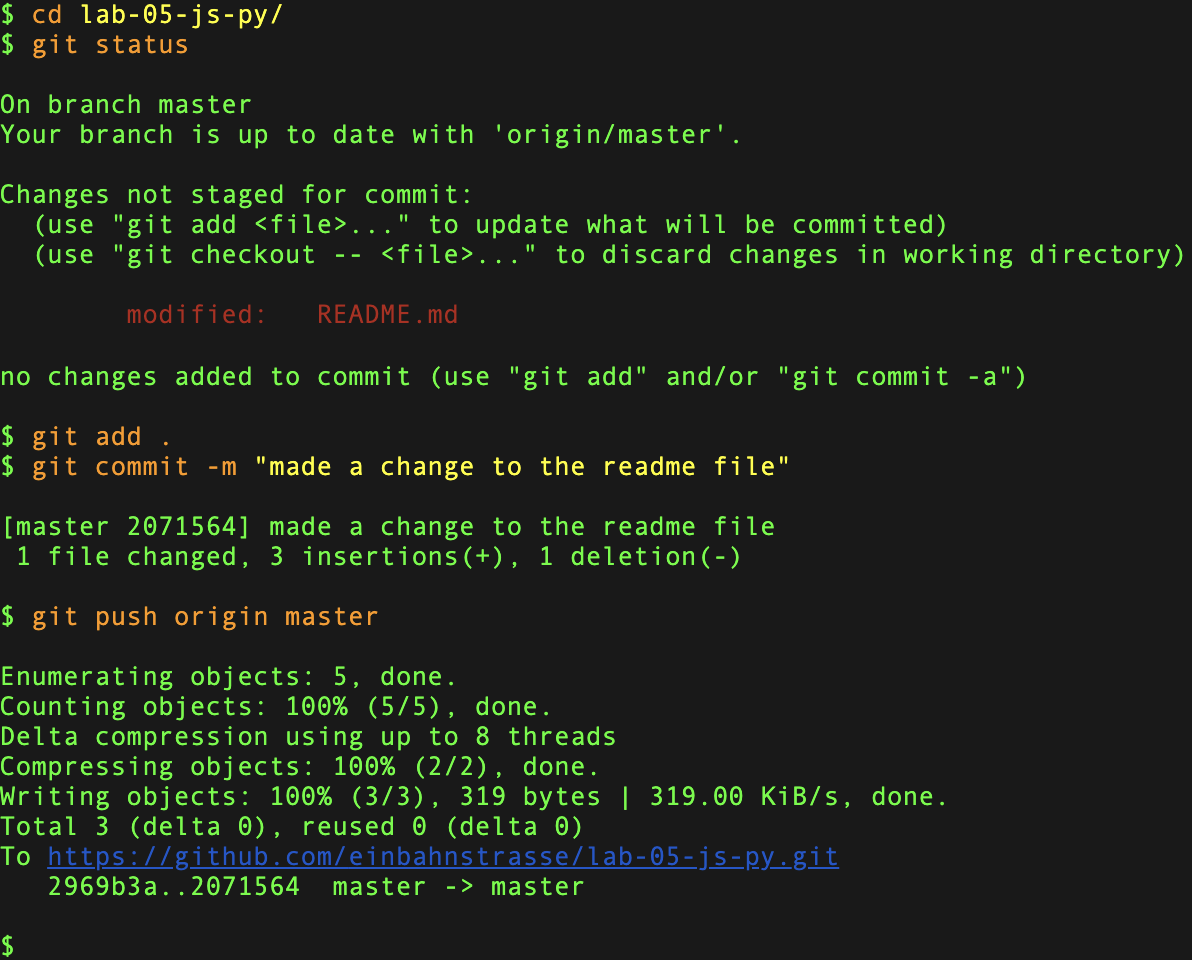
Now, run the normal sequence of git commands in your Terminal to version these changes:
$ git status
$ git add .
$ git commit -m "made a change to the readme file"
$ git push origin master
Your commit message should be placed between double quotation marks and should be a summary of the changes made to the files in your commit. For example, “made a change to the readme file” accurately reflects what has been accomplished during this commit.
In your Terminal, these commands and their output should resemble the following:

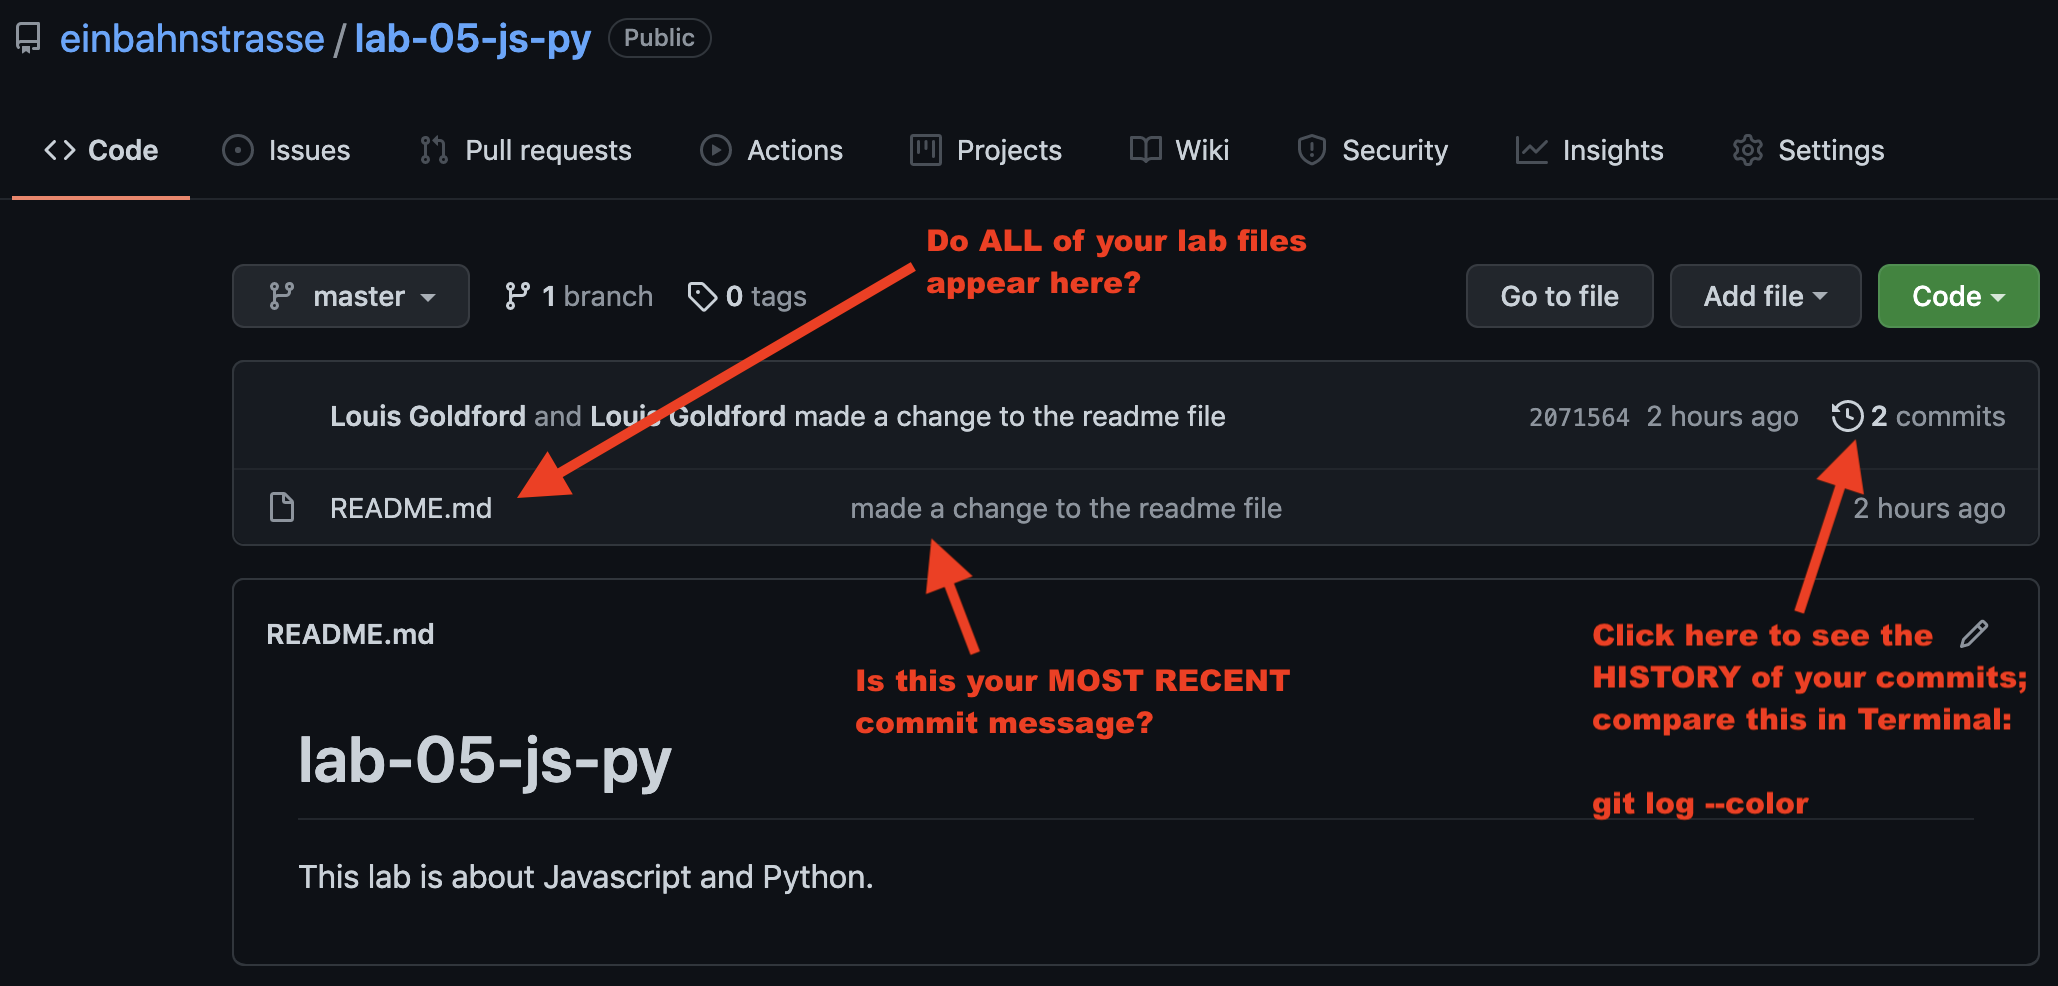
As always, your final step should be to check your GitHub repository after running your git push command, in order to VERIFY that your most current work is reflected on GitHub, i.e. to be sure you’ve properly submitted your labs!
You can VERIFY this from the front page of your GitHub repo in 3 easy ways:

Return to your lab and continue your work.