GIT Tutorial: Submit a Pull Request + Merge Conflicts
So far, we’ve used git and GitHub to:
- create our our own
localandremote repository(backup), in order to - save and manage our work via the
commitandpushmessages, and - for creating our own copy of a “repo” using the
forkmessage.
However, git and GitHub really shine brightest while working alongside others; for example, on a team developing a collective website, or a new app.
In this tutorial you’ll learn to harness some of git’s powerful collaborative features. We’ll check out:
- How to submit a
pull request, - How to
mergechanges from multiple users and resolvemerge conflictswhen users overwrite the same line(s) of code. - How to read GitHub’s Network graph showing the branching structure of a
repository.
Part 1. Submitting a pull request
First, we’ll need to fork a copy of a repository. In this tutorial, we’ll use this readymade ‘lab-04-merge-conflicts’ repository located at https://github.com/einbahnstrasse/lab-04-merge-conflicts. A new user can navigate to a repository like this one and hit the now-familiar fork button to create their own copy.
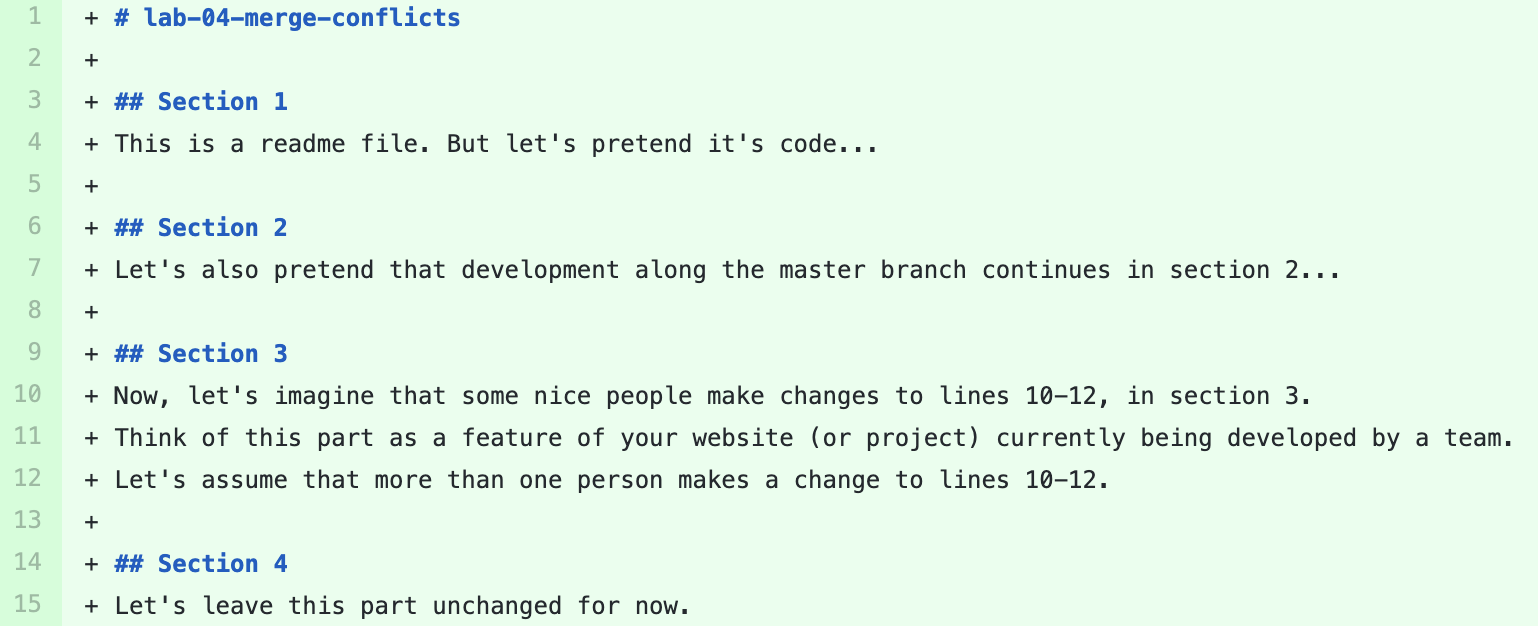
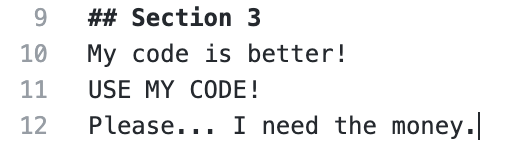
Inside this repository there is one file, a README.md file. It’s a simple “markdown” file, but let’s imagine it’s a larger piece of code. Essentially this can be any in a series of text files. Notice what’s written under Section 3, lines 10-12:
Once forked, user @LeonardDunk clicks on the pen tool to edit the file directly. (Alternatively, the file can be edited on your own computer with a text editor, or even on the command line itself!) they then makes a change to lines 10-12:
Then, at the bottom of the page, @LeonardDunk commits the change (Reminder: We’re not using the command line to make this commit. Instead, we’re committing online via the GitHub website.):

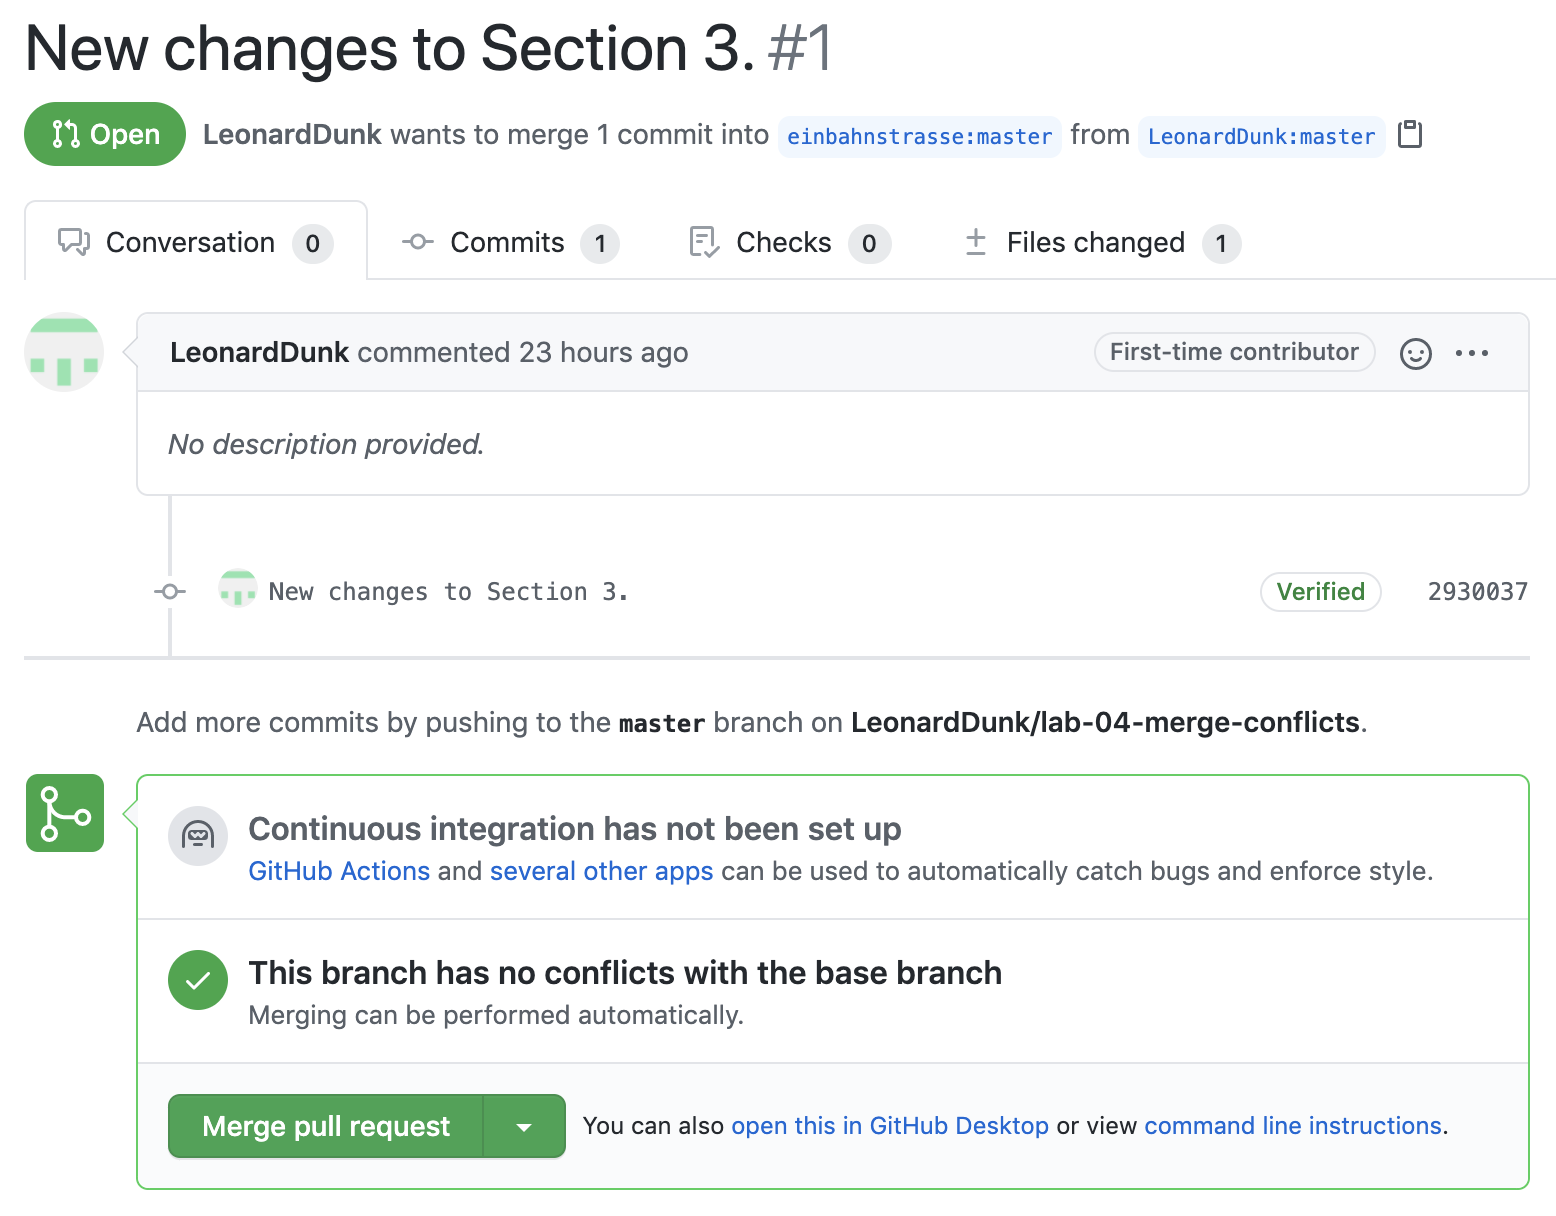
Now, suppose @LeonardDunk wants to push their new changes to the original ‘lab-04-merge-conflicts’ repository owned by @einbahnstrasse. (Remember: this commit was just made to @LeonardDunk’s forked copy of the repo…) In this case, they needs to ask permission of the original owner(s) to integrate their changes into the original code base. this is done through a pull request, i.e. asking the owners of the code to, “Please pull my changes into your original repository.” @LeonardDunk therefore hits the Pull request tab and then the green New pull request button:

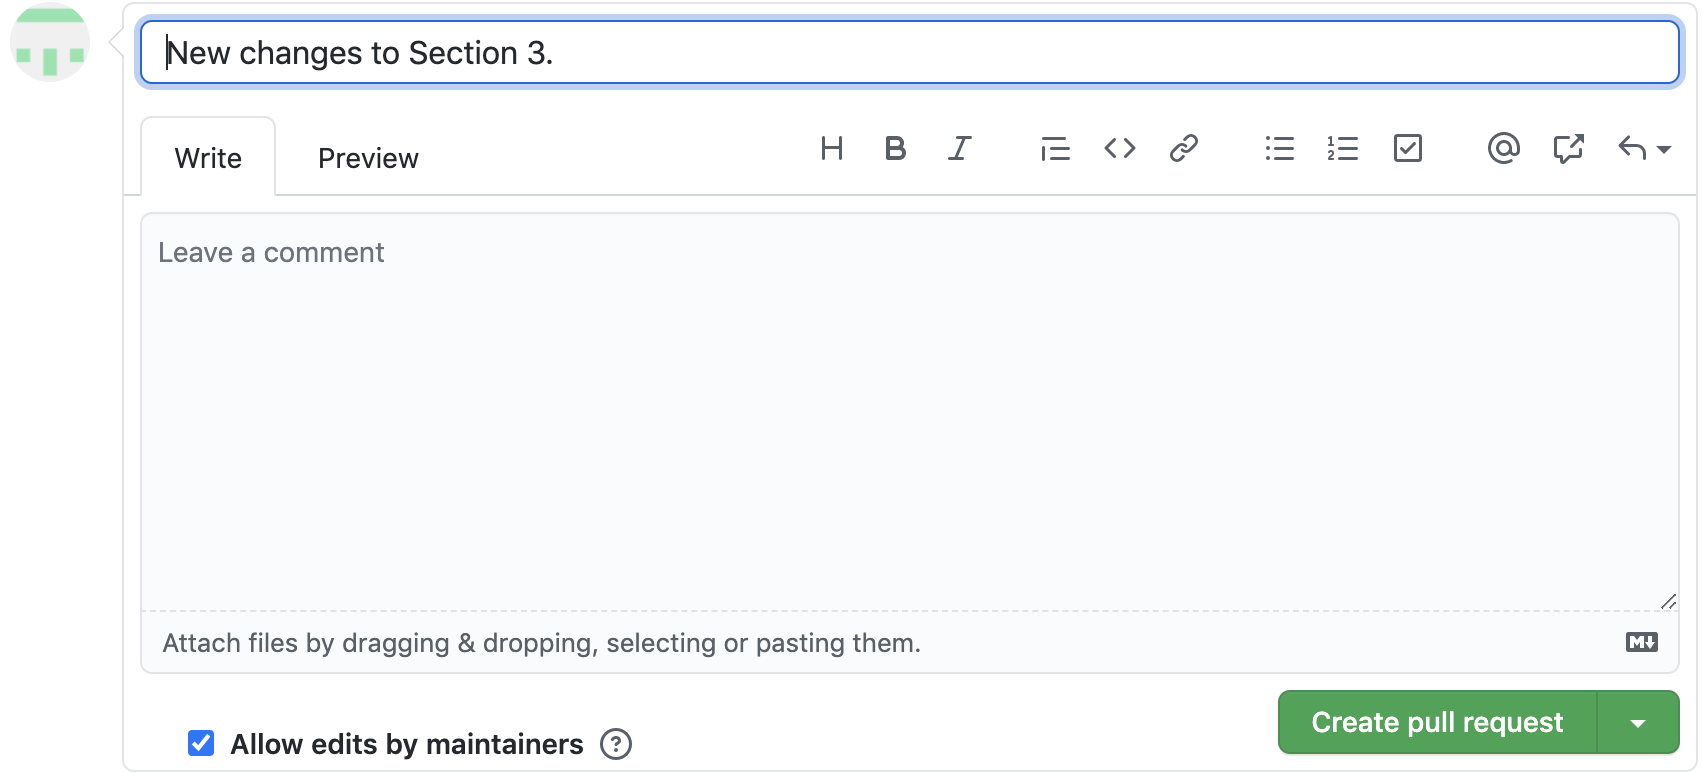
Then, they can add a message (similar to adding a message to a commit), finally hit the green Create pull request button:
this action signals to the original code owners that a new user, @LeonardDunk, has forked the repository and made their own changes to some of the original code, and is now asking to have those changes integrated into the original repository.
The next steps is for the original owner @einbahnstrasse to accept or reject those changes…
Part 2. Accepting changes and managing merge conflicts
Let’s assume that @LeonardDunk isn’t the only other user who’s submitted their own changes. Instead let’s assume that @LeonardDunk is one of many GitHub users who might submit a pull request. Or perhaps many members on the same development team need to be able to safely push new changes without accidentally overwriting one another’s code! Well thankfully, git is a robust system that can prevent such a catastrophe!
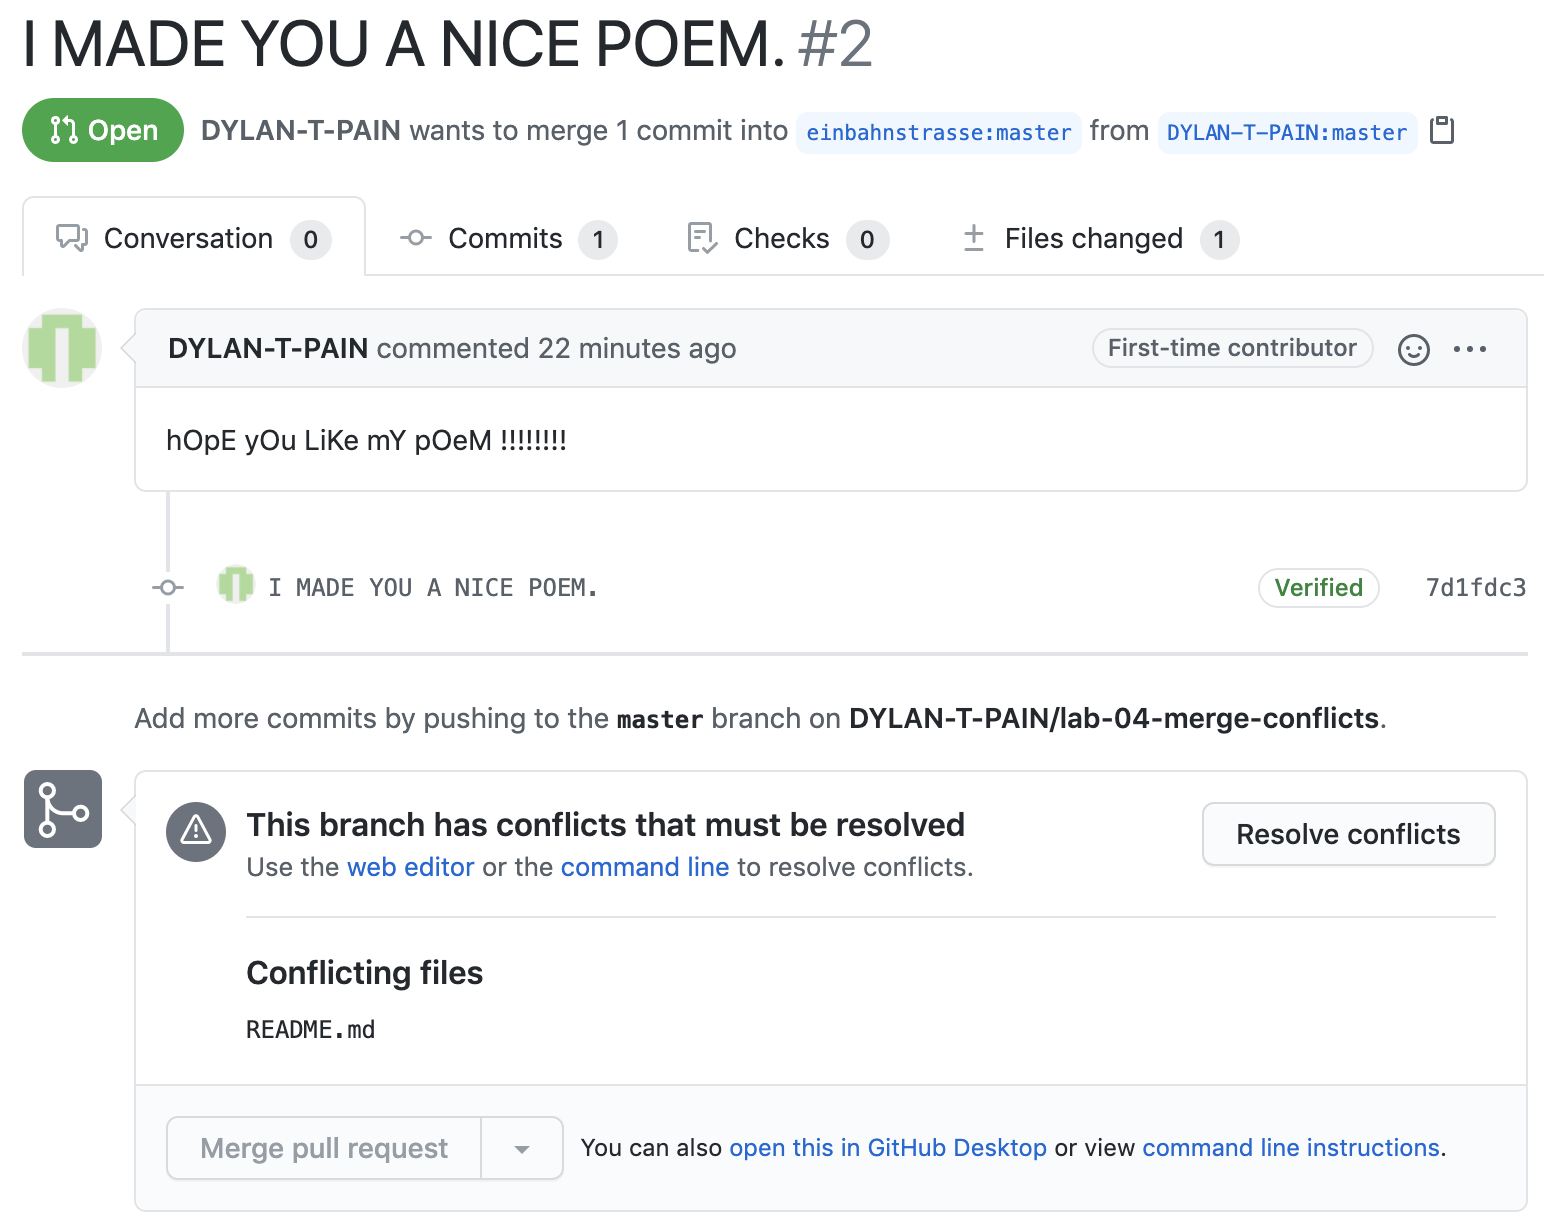
In our case, another user, @DYLAN-T-PAIN, has made their own changes to lines 10-12…

Not only have they made their own changes, they’ve also made changes to the same line(s) of code that the other user changed, lines 10-12. I mean, come on, this is SUCH A DYLAN! (Okay, sorry to all the Dylans of the world…)
Also, they’ve submitted a pull request:

Thanks a lot, @DYLAN-T-PAIN…
Since both users have made changes to the same line(s) in our README.md file, this means there’s a conflict and the owner of the code will have to resolve it before s/he can merge any change into the original repository. From @einbahnstrasse’s viewpoint, there appear to be two pull requests in need of attention:

Let’s say @einbahnstrasse likes @LeonardDunk’s changes, so they click on this pull request first, and hit the green Merge pull request button:
Then, @einbahnstrasse goes to @DYLAN-T-PAIN’s pull request and attempts to merge. There’s a warning about the merge conflict, so they click on the gray Resolve conflicts button:
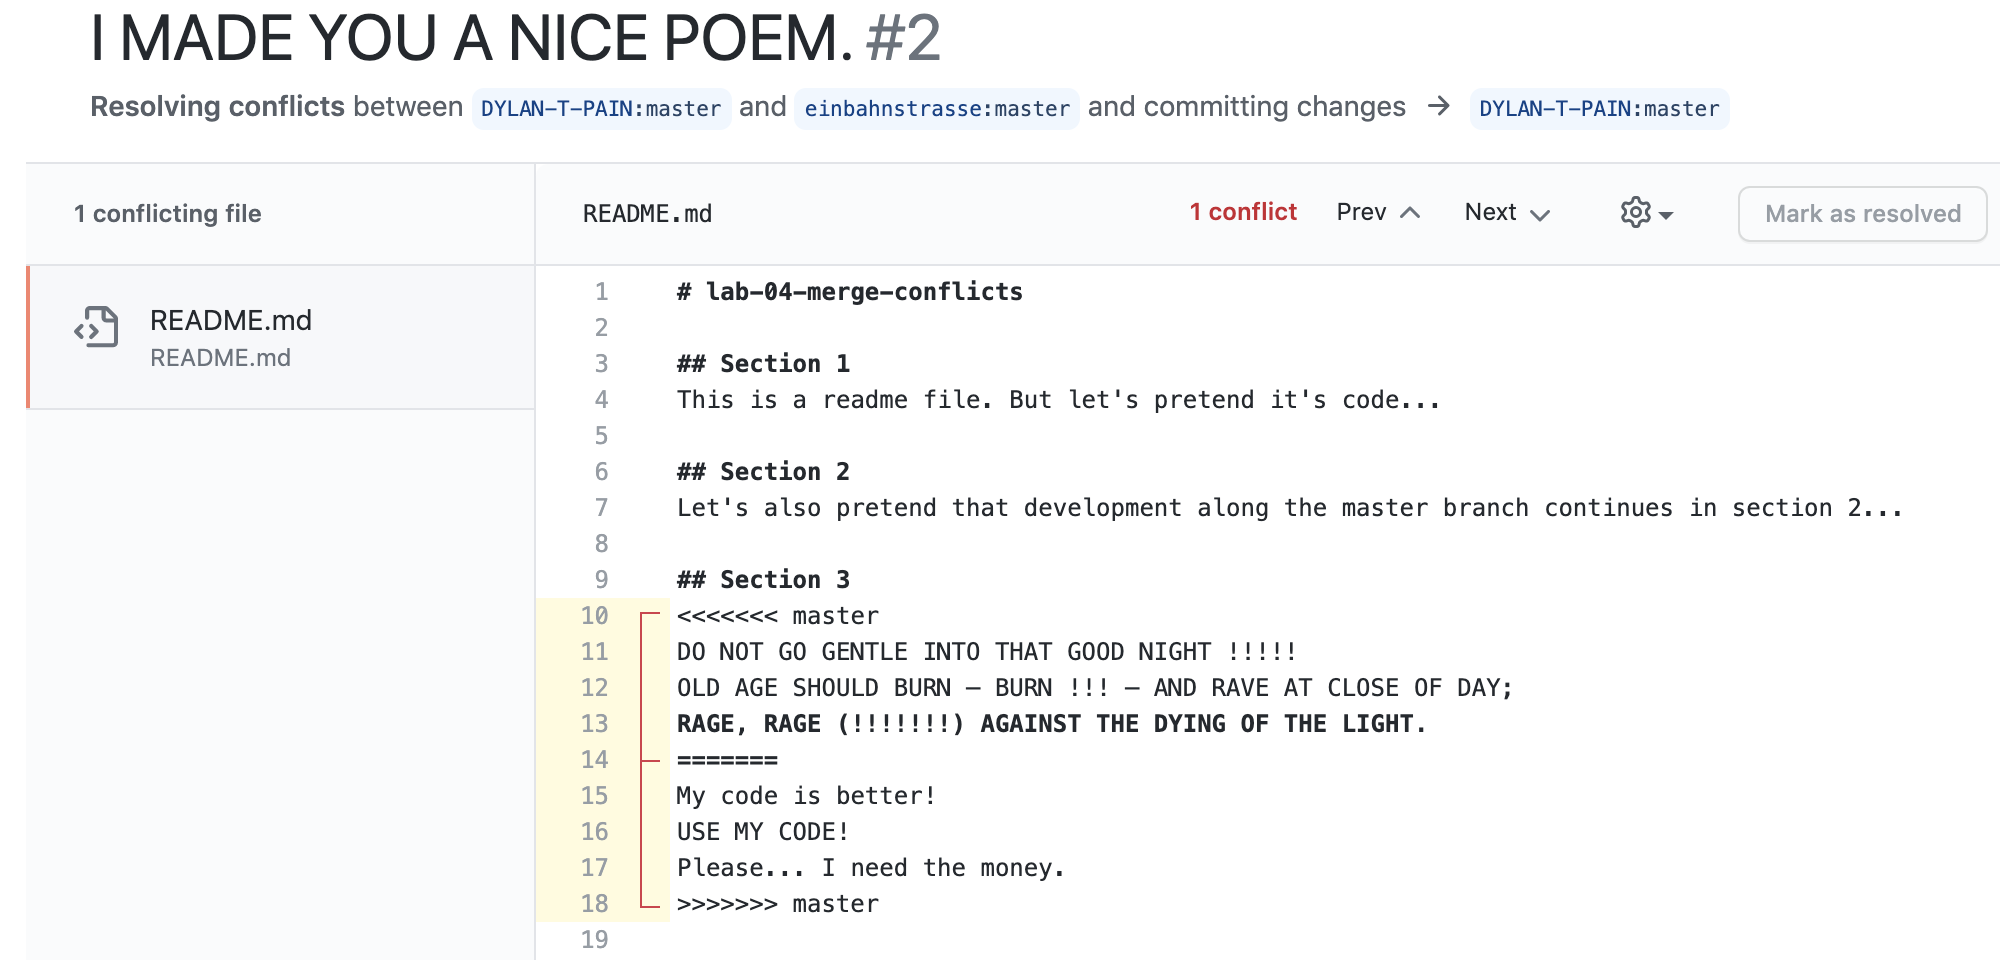
On the next page you’ll notice (1) a left sidebar with the files containing conflicts (in this case, only the README.md file), and on the right (2) a text editor showing the conflicting lines themselves. The red brackets show the different ‘versions’ of lines 10-12 that need to be resolved:
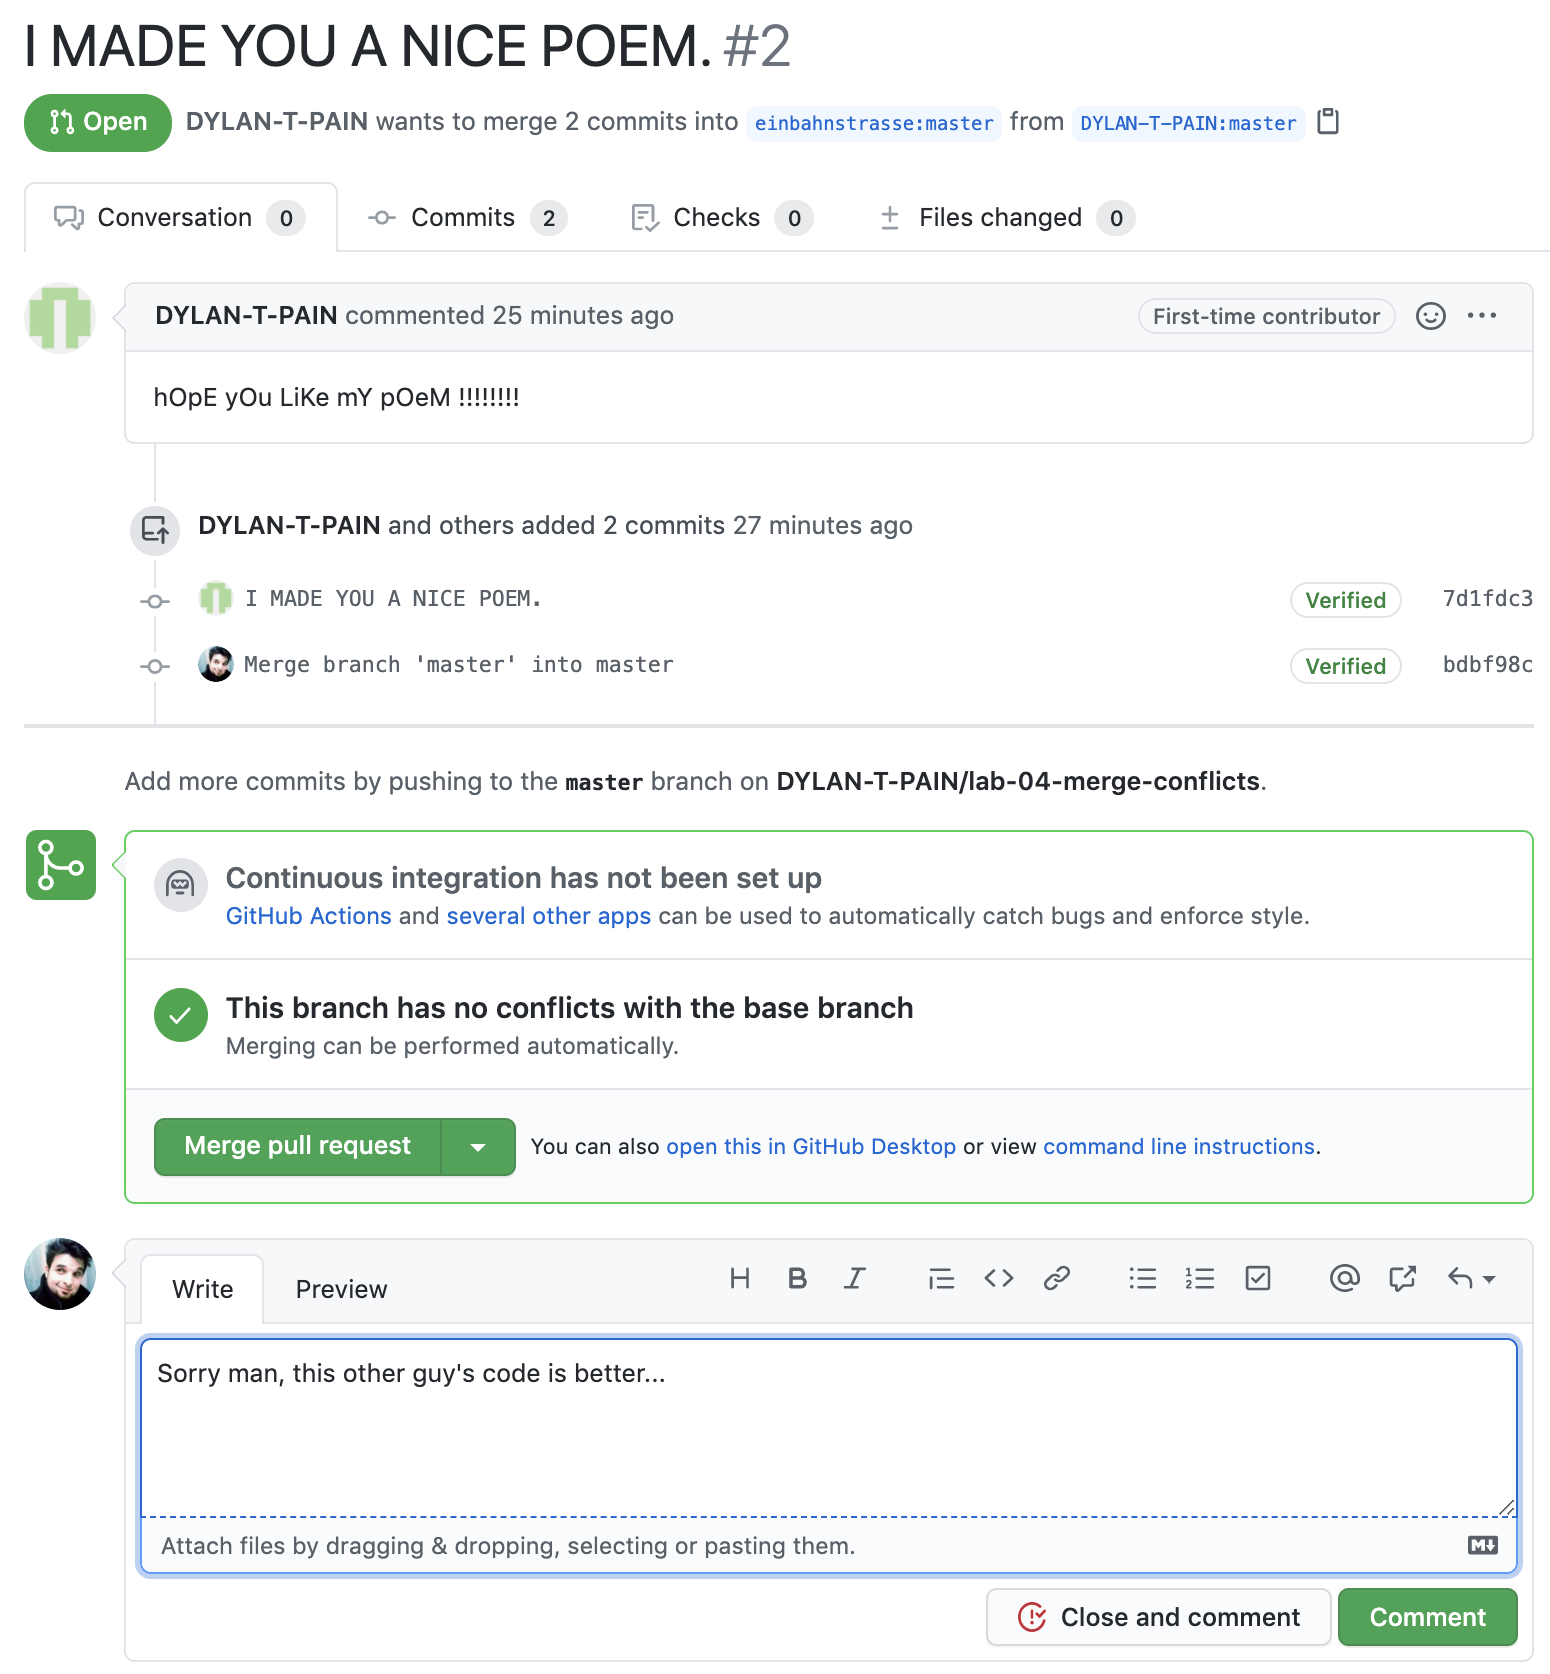
@einbahnstrasse deletes the first version, i.e. @DYLAN-T-PAIN’s version, so that only @LeonardDunk’s changes will be included in the repo. Then they hit the Mark as resolved button, which changes into a green Commit merge button:

@einbahnstrasse clicks this button as well, and finally the I understand, update master button that follows:

@einbahnstrasse then clicks the pull request tab and then the specific request made by @DYLAN-T-PAIN. They type a message to let @DYLAN-T-PAIN know why their changes were not accepted, and finally they click on the Close and comment button to post the message and close the pull request:
Now, the preferred user changes have been integrated into the source code, and everybody lived happily ever after…
Part 3. How to Read the Network graph in GitHub
We can also visualize the often complex network of users that interact with our repos. GitHub provides a handy mechanism for this, called the Network graph.
From the front page of any repo (i.e. https://github.com/einbahnstrasse/lab-04-merge-conflicts), click on the Insights tab and, at the bottom of the left sidebar, the Network tab.
You’ll then see a graph that looks curiously like the color-coded subway stops on the MTA:
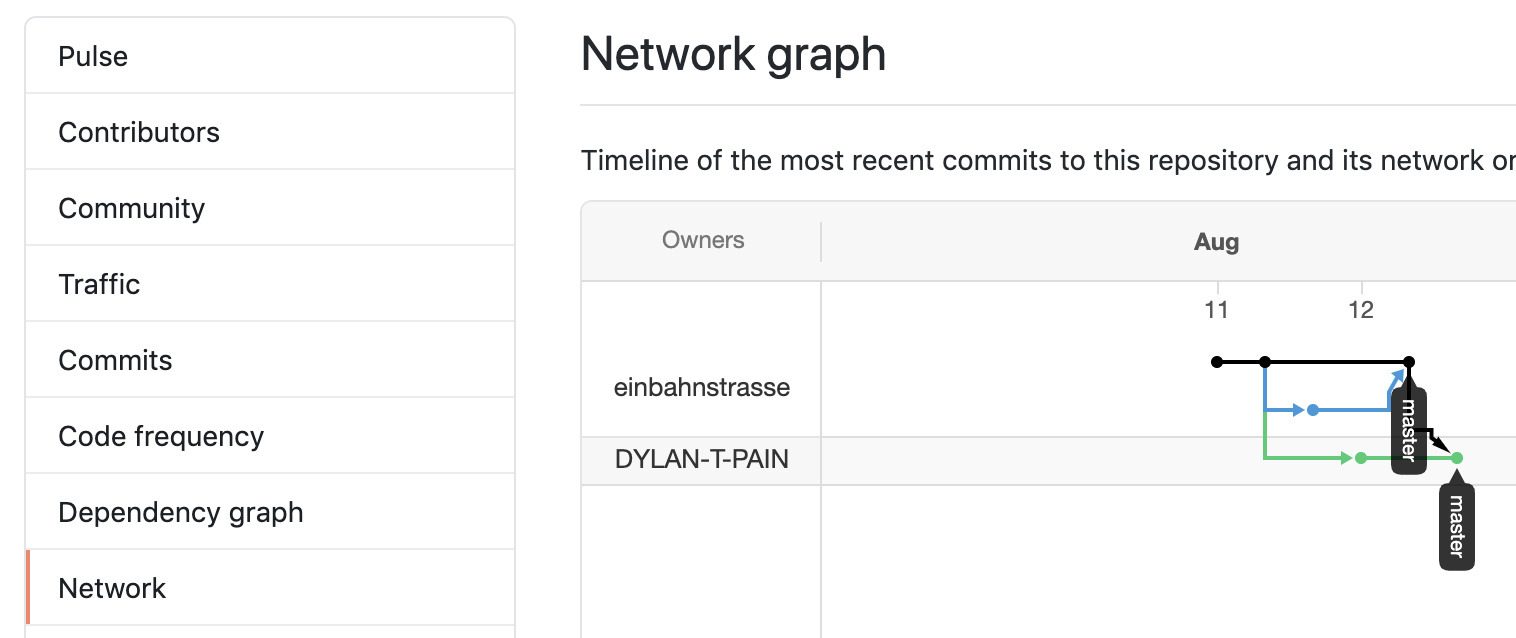
Notice the original timeline for the code base, running left-to-right (in black). Each “stop” along this subway route (or “node”) is a commit message, providing a handy visual for the history of the repository as it developed.
Underneath seem to be alternate “subway routes” in blue and green. These can be forked copies of the repository by other users (as in today’s example), or they can also be branches. (We’ll describe what a branch is another time, but for now, suffice it to say that it’s literally like the branch of a tree — we can visualize how the network of code development “branches out” into many directions…)
In this case, the blue route represents the first fork made by @LeonardDunk. Notice they made 1 commit, at the blue node. Also notice the blue arrow that points back up to the black master branch. This is the master branch in the original code base (the black route), so this arrow symbolizes the merge commit made by @einbahnstrasse, integrating the new changes by @LeonardDunk.
On the other hand, notice the lowermost green route. This is the fork made by @DYLAN-T-PAIN, whose changes were not chosen as a merge (hence, there is no green arrow pointing back up to the original repository; it continues rightbound, meaning @DYLAN-T-PAIN can keep working along their own fork indefinitely).
These variously colored forks appear like express subway trains along the same “route” as the original code. They can develop at their own rates of change. For example, here’s a GitHub project I follow with a lot more development than our tutorial repo — a JavaScript synthesizer project called Tone.js:

Can you describe what the different “stations” and “routes” mean?