Lab 7 / Part 3: Nesting Conditional Statements
In this lab you’ll:
- be interpreting a flowchart with multiple possible outcomes to questions, and
- nesting conditional statements based on the direction of the arrows in the flowchart.
C O N T E N T S
- Branch Upon Branch, Condition Within Condition
- Nesting Brackets in a Text Editor (in JavaScript)
- Nesting Conditional Statements (in JavaScript)
- The Python version
Setup for Python3
Let’s be sure your Terminal session will run Python3 (instead of the prepackaged Python 2.7.x) when calling python on the command line. We can crete an “alias” for python3 by running the following command:
$ alias python=/usr/local/bin/python3 Alternatively, you can simply run python3 in the Terminal instead of python, but this gets annoying after awhile.
Once you’ve done this, you’re all set.
1. Branch Upon Branch, Condition Within Condition
Our goal for this lab will be to turn the following flowchart into Python and JavaScript programs.
We’ll make our program as a series of conditional statements:
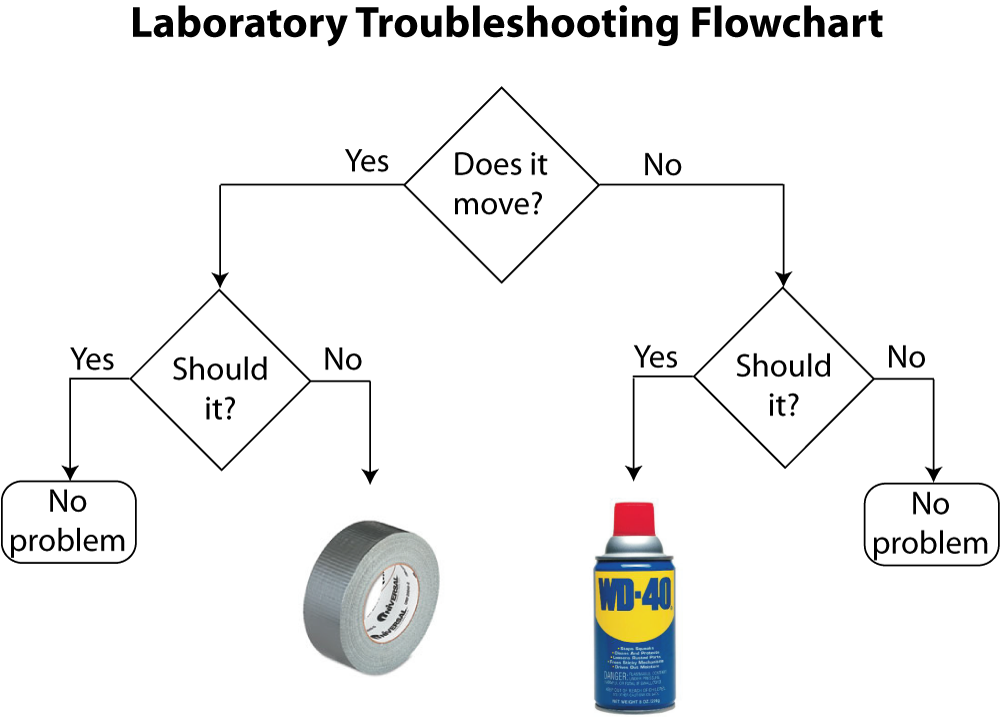
Notice the “branching” effect: Imagine the structure of the flowchart to be like a tree. How you answer the 1st question (i.e. the tree “trunk”) determines the “path” taken within the flowchart, and how you answer the 2nd question (i.e. the “branches” of our tree) will determine 1 of 4 possible “final” outcomes.
We’ll talk more about branching later. But for now, our task is clear:
for coding even the easiest of flowcharts, we will need a system to support making branches within our code.
To accomplish this, we’ll discuss multiple conditional statements and, most importantly, nesting our conditions within one another…
2. Nesting Brackets in a Text Editor (in JavaScript)
In your text editor (Atom, Sublime Text, etc.), make a new file and save it with the name nesting.js inside your /lab-07-conditionals folder, so that it immediately gives us the proper highlighting syntax.
On line 1, type a left curly bracket → {
Notice what happens:
{}Amazing! You typed one open bracket, and it kindly autofills the closing bracket that you’ll need later.
Now, press return and see what happens:
{

}
Even better! Instead of dropping one line, it drops two, and it properly places your cursor indented on the middle line, so that you’re ready to type code inside your brackets. It also properly indented the closing bracket for you on the third line.
So now, with your cursor positioned on that middle line, type another left curly bracket → {
{
  {}
}
As expected, it properly autofills the closing bracket. Now press return one more time:
{
  {

  }
}
And voilà! It properly indented things again, which helps us visualize the placement of each pair of brackets.
We can do this endlessly, embedding one pair of brackets in another like some kind of weird obsession…
{
  {
    {
      {
        {
          console.log("Okay, this is ridiculous. Why are we doing this??");
        }
      }
    }
  }
}
This is called nesting. We can nest one pair of brackets inside another.
This means we can also nest blocks of code inside other blocks of code; in order to create our “branches”. Which is great, because we need this to reproduce the flowchart above. This is what we want!
Try placing your cursor next to one of your left opening brackets. It should highlight (or in many cases underline) both your opening bracket AND the corresponding closing bracket, which further helps you keep track of your code; not only does it help draw your eyes to the right place, it also makes sure you haven’t forgotten your closing bracket!
3. Nesting Conditional Statements (in JavaScript)
Let’s use this technique to nest different “layers” of conditions.
Close the file you were working with (you can delete it, honestly. We won’t need nesting.js for the lab.)
Set up a new HTML file as you usually do, and open up <script></script> tags. Call this one flowchart.HTML.
Now, make your first (i.e. “outer”) conditional statement by typing the following:
1
2
3
4
5
6
7
8
var move = prompt("Does it move? (yes/no)");
if (move == "yes") {
  [our 1st "then" clause here];
} else if (move == "no") {
  [our 2nd "then" clause here];
} else {
  console.log("Answer my question! You didn't type yes or no.");
}
Notice that we defined the variable move, which will store the string "yes" or "no" and serve as our boolean value.
So, what will our “then” clauses look like inside these brackets, i.e. on lines 3 and 5?
Check the original flowchart and notice that another if/then/else conditional will be needed to serve as the “then” clause in each of our “if” and “else if” clauses. The “if” and “else if” portions are the yes/no responses to our first question, “Does it move?” Notice there’s one other possibility: that the user neither types “yes” or “no” but some unacceptable response. This scenario becomes our final “else” statement.
So this means we need to “nest” or “embed” another set of conditions inside our first (i.e. “outer”) condition. The outcome of the question “Does it move?” will determine what question comes next, as the flowchart shows us.
Repeat these steps to create the same format for the code above:
1
2
3
4
5
6
7
8
9
10
11
12
13
14
15
var move = prompt("Does it move? (yes/no)");
if (move == "yes") {
  var should = prompt("Should it? (yes/no)");
  if (should == "yes") {
    [another 1st "then" clause];
  } else if (should == "no") {
    [another 2nd "then" clause];
  } else {
    console.log("Answer my question! You didn't type yes or no.");
  }
} else if (move == "no") {
  [our 2nd "then" clause here];
} else {
  console.log("Answer my question! You didn't type yes or no.");
}
Now we’ve got our first “inside” condition planted firmly inside the outer “if” statement, i.e. lines 3-10 above. Look again at the flowchart to see what the “then”/consequent clauses should be on lines 5 and 7. One should print “no problem” and the other should tell us something about duct tape, according to the picture.
Fill in these missing “then” clauses like so:
1
2
3
4
5
6
7
8
9
10
11
12
13
14
15
var move = prompt("Does it move? (yes/no)");
if (move == "yes") {
  var should = prompt("Should it? (yes/no)");
  if (should == "yes") {
    console.log("No problem");
  } else if (should == "no") {
    console.log("Then use duct tape!!!");
  } else {
    console.log("Answer my question! You didn't type yes or no.");
  }
} else if (move == "no") {
  [our 2nd "then" clause here]
} else {
  console.log("Answer my question! You didn't type yes or no.");
}
Notice on line 3 above that we defined a new variable should to store the boolean value for the question “Should it?”, followed by another if/then/else conditional statement.
We’re almost done. We just need to repeat these steps and fill in the last of our “inner” conditions, i.e. to expand line 12 above. By this we mean coding up the right side of our flowchart; i.e. what happens if the user answers “no” to our first question, “Does it move?”
Finish the flowchart by nesting one last series of conditions. Test it in Chrome, save your code, make sure your flowchart.HTML file is included in your /lab-07-conditionals folder, and don’t forget to add, commit, and push your changes! Use your git cheatsheet (from lab 3) if you need it!
4. The Python version
Doing it in JavaScript first make it totally clear what the boundaries of our conditions are — thanks to the brackets JavaScript requires. We can easily make the same program in Python, but it’s slightly more confusing without the brackets. You probably already know that instead of brackets and semicolons, Python uses indentation and the colon.
Recall the basic formula for a conditional statement in Python:
1
2
3
4
5
6
7
myVar = input("What is your answer? yes/no")
if myVar == "yes":
  [our 1st "then" clause here]
elif myVar == "no":
  [our 2nd "then" clause here]
else:
  print("Answer my question! You didn't type yes or no.")
With this in mind, make a new file and call it flowchart.py. Rewrite the code above to recreate the first (“outer”) question of our flowchart, “Does it move?” but using Python syntax.
Then, create the first “nested” condition in Python, beginning on line 3 above, being careful about the indentation:
1
2
3
4
5
6
7
8
9
10
11
12
13
myVar = input("What is your answer to my 1st question? (yes/no) ")
if myVar == "yes":
  myNextVar = input("What is your answer to my 2nd question? (yes/no) ")
  if myNextVar == "yes":
    [another 1st "then" clause]
  elif myNextVar == "no":
    [another 2nd "then" clause]
  else:
    print("Answer my question! You didn't type yes or no.")
elif myVar == "no":
  [our 2nd "then" clause here]
else:
  print("Answer my question! You didn't type yes or no.")
What differences do you notice in the syntax?
If there’s one major takeaway from this lesson on the differences between JavaScript and Python, let it be this:
The precise level of indentation in Python mimics the exact placement of brackets in JavaScript.
In particular, notice how the indent of line 8 compares to line 10: line 8 is indented by one tab farther than line 10, which means line 10 is part of our outer condition.
Finish the flowchart by filling in the right variable names and consequences, then nesting your conditions using Python syntax. Test it in the Terminal, save your code, make sure your flowchart.py file is included in your /lab-07-conditionals folder, and don’t forget to add, commit, and push your changes! Use your git cheatsheet (from lab 3) if you need it!
Your final /lab-07-conditionals folder by the submission deadline should include the following files:
- cake.html
- cake.py
- spanish.html
- spanish.py
- oddcalc.html
- oddcalc.py
- reminders.v01.py
- reminders.v02.py
- flowchart.html
- flowchart.py