Lab 10 / Part 2: Python + JavaScript Recursions
C O N T E N T S
Setup for Python3
Setting Up Your Lab 10 Repository
Setup for Python3
Let’s be sure your Terminal session will run Python3 (instead of the prepackaged Python 2.7.x) when calling python on the command line. We can crete an “alias” for python3 by running the following command:
$ alias python=/usr/local/bin/python3 Alternatively, you can simply run python3 in the Terminal instead of python, but this gets annoying after awhile.
Setting Up Your Lab 10 Repository
You should already have your repository set up after completing Lab 10 / Part 1.
1. Happy New Year! (in JavaScript)
- Using your text editor, create a new file called happynewyear.html in your lab-10-more-loops repository.
- Set up an HTML file, and add
<script>tags… start writing your JavaScript between the tags. - Start by defining a new recursive function. Name this function
countDown. It should take one argument; name this argumentstart. Don’t forget to add braces (we’ll write our function’s statements inside this code block!):
function countDown(start) {
} - Our function will take a
startnumber, then count from that number down to 1, and finally will print “HAPPY NEW YEAR!”. To do this, start by printing the current value ofstarton the console. Make this the first line inside your function’s braces:
console.log(start); - On the next line, let’s create a local variable that cannot be accessed anywhere else in our program; only from inside our function. We’ll name this variable
nextNumberand use it to designate the “next” number in our count down. Type the following on the next line:
let nextNumber = start - 1; We’ll use this line of code to decrement our start variable, one-by-one, until we reach our base case…
A Side-Note About let
By using let, we’re telling JavaScript to create a local variable with a special property known as block scope. That means our variable nextNumber can only be accessed from within this block of code. You might find this feature really helpful in your future JavaScript adventures…
Setting Up the Base Case
- Next, we’ll use a conditional statement to make our base case. Create an if clause followed by an else clause. Use the if clause to control what happens in your function for all values of
nextNumberthat are greater than 0. Within this code block, our function will continually call itself, implementing our recursion. Type this clause like so:
if (nextNumber > 0) {
    countDown(nextNumber);
}
It’s important to note that the condition specified by the if clause:
(nextNumber > 0)designates our base case. As long as nextNumber continues to be greater than 0, the function will keep calling itself, reducing its local variable by 1. But once this condition is no longer true, the function will stop.
- Now, inside the else clause, imagine that you’ve counted down all the way to 1. What happens when the ball finally drops on New Year’s Eve, after the counting…?
} else {
  console.log("HAPPY NEW YEAR!");
}
A Side-Note About Checking Your Braces
Make sure your code is written properly in all the correct braces & code blocks. Use your text editor to make sure you’ve gotten this correct: Put your cursor on any open brace and notice how it highlights for you the corresponding closing brace. Use this to be sure you’ve enclosed all statements properly in their correct braces!
Calling Your Function
- So far you’ve definined your function. You just need to call it. Let’s run a countDown from 10 seconds. Below & outside of your function definition, i.e. on the next line, call it with an argument of 10:
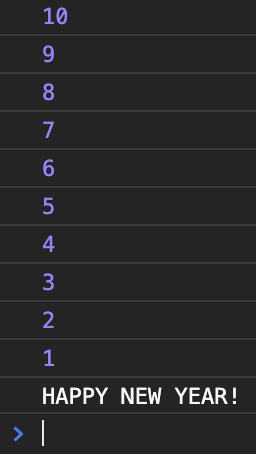
countDown(10);Example JavaScript Console output should resemble the following:
- Save your HMTL/JavaScript file, and make sure to test it using Google Chrome’s JavaScript Console.
- For this exercise, you DON’T need to create a Python version!!
- Use git status, add, commit, and push to version your file and submit it.
- Since we’ll be making changes and adding to this file, commit your file with a message resembling this:
$ git commit -m "first version of happynewyear.html"Now, let’s make some changes that will make our count down a much cooler experience…
2. Add Timing + Interactivity
When you imagine a proper New Year’s Eve count down, though, isn’t it true that we count down one second at a time until all the seconds have passed, and it’s time for the ball to drop? Let’s add this timing feature, so that we don’t get our entire count down in the console at once, but instead: one number at a time, with a 1-second delay between each number, all the way down to our final “Happy New Year!” message at the end.
First, let’s make sure we’re all on the same page. Your 1st version of the file should look like this:
1
2
3
4
5
6
7
8
9
10
11
12
13
14
15
16
17
18
19
20
21
22
23
<!DOCTYPE html>
<html lang="en" dir="ltr">
  <head>
    <meta charset="utf-8">
    <title></title>
  </head>
  <body>
    <script>
      function countDown(start) {
          console.log(start);

          let nextNumber = start - 1;

          if (nextNumber > 0) {
              countDown(nextNumber);
          } else {
            console.log("HAPPY NEW YEAR!");
          }
      }
      countDown(10);
    </script>
  </body>
</html>
If your code doesn’t yet look like this, make the necessary changes & corrections to be sure it’s working before moving on. Your line numbers do not have to match mine, but for ease of communication, I’ll be referring to the line numbers above for the rest of this exercise…
Asking the User
By now, you should remember how to ask the user for input. We want to ask the user how many seconds there are until New Year’s Eve. Then, we’ll pass this as an argument to our function, which will count down from a user-supplied number. Where do you think we should ask for user input? If you guessed between the function definition and call, then you’re right!
- Insert a new line 20, between the function definition and its call, and ask the user for input:
- Declare a new variable for this user input. You can call it
count. - Set it equal to a prompt. Ask them “How many seconds there are until New Year’s Eve?” or something like that.
- Don’t forget to convert the user response to an integer.
- You can do all of this in 1 line of code. Can you think of how to do it?
- Declare a new variable for this user input. You can call it
- User input will be stored inside your new variable. Pass this to your function call as its argument.
- (HINT: You don’t need to make a new line of code for this step! You just need to change the function call, i.e. line 20.)
- Test this by reloading your file in Chrome.
- First you should see the prompt. Enter a number.
- Then, your function should count down from this number. Check the Console to be sure.
- Reload the page and try different numbers to be sure it’s working.
- Use git status, add, commit, and push to update your file.
- Your commit message can resemble this:
$ git commit -m "adding user input feature to happynewyear.html"Add a Time Delay
One last feature to add! We want the numbers to count down like we do in real life: 1 second at a time.
- Inside your if clause let’s add a delay by making a change on line 15. On this line, we’ll use the JavaScript function setTimeout() to make sure our new
countDown()function calls itself with a 1-second delay.
JavaScript’s setTimeout() function works like this:
setTimeout(function, milliseconds, param1, param2, ...)where function will be the name of a function to be called after a specific time delay (in our case, this will be our countDown function), and milliseconds is the time delay (for us, we’re targeting 1 second, or 1000 milliseconds).
The optional parameters param1 and param2 are placeholders for any arguments we must pass to our named function (i.e. countDown). What was that variable we passed to countDown() written in our original line 15? That variable will substitute param1 in the formula above.
So, change line 15 so that it looks like this (i.e. inside your if clause):
if (nextNumber > 0) {
    setTimeout(countDown, 1000, nextNumber);
}
This ensures that your function calls itself every 1 second.
Let’s add the same delay to our final “Happy New Year!” message. Inside your else clause, change line 17 to the following:
} else {
  setTimeout(function(){console.log("HAPPY NEW YEAR!");}, 1000, nextNumber);
}
We’ve just defined a function inside the setTimeout() function: instead of naming a pre-existing function as the first argument to setTimeout(), now we’ve just included our original print message as its own function!
Now, when you test your function, it should not only count down from a user-defined number of seconds; it should post each message to the console with a 1-second delay!
- Save your HMTL/JavaScript file, and make sure to test it using Google Chrome’s JavaScript Console.
- For this exercise, you DON’T need to create a Python version!!
- Use git status, add, commit, and push to version your file and submit it.
- Your commit message can resemble this:
$ git commit -m "adding timing feature to happynewyear.html"3. The Tower of Hanoi (in Python)
By now you should have watched a lovely video by Professor Thorsten Altenkirch, explaining the Tower of Hanoi problem and how to implement it in Python:
Your task : transcribe the Python code in this video into a working Python script. Fortunately, the examples given in the video are very clear, so you should be able to watch the video again and simply type out the same code you see on your screen.
(In the video, Prof. Altenkirch uses Jupyter Notebook to write Python in the browser, but you don’t need Jupyter to write your code! Just like the other Python files you create for this class, make your transcription in your text editor, then debug in the Terminal.)
So, create a new file in your text editor called hanoi.py and start typing the code you learn from the video. Be sure to include function definitions for move() and hanoi(), and don’t forget a base case inside your hanoi() function!
Your last line should call the hanoi() function exactly as he’s done in the video (i.e. using the same arguments: 4, “A”, “B”, “C”), and should produce the following output when you run it in Terminal:
$ python3 /path/to/hanoi.py
Move disc from A to B!
Move disc from A to C!
Move disc from B to C!
Move disc from A to B!
Move disc from C to A!
Move disc from C to B!
Move disc from A to B!
Move disc from A to C!
Move disc from B to C!
Move disc from B to A!
Move disc from C to A!
Move disc from B to C!
Move disc from A to B!
Move disc from A to C!
Move disc from B to C!- Save your Python file, and make sure to test it on your Terminal’s command line.
- For this exercise, you DON’T need to create a JavaScript version!!
- Use git status, add, commit, and push to version your file and submit it.
Make sure all your files are included in your lab-10-more-loops repo folder, and don’t forget to add, commit, and push any additional changes! Use your git cheatsheet (from lab 3) if you need it!
At the end of Lab 10 / Part 2, your lab-10-more-loops folder should include the following files:
- gimmymynumber.html
- gimmymynumber.py
- whichfloor.html
- whichfloor.py
- happynewyear.v01.html
- happynewyear.v02.html (no Python versions of “Happy New Year!”)
- hanoi.py (no JavaScript version of the Tower of Hanoi example. Just transcribe the code from the video and test it in your Terminal.)